

Sourdough Sandwich Bread (Soft & Fluffy)

This post contains affiliate links. Please read our disclosure policy.
If you've been looking for a soft, reliable, everyday sourdough sandwich bread, this is the one! It's naturally leavened with active sourdough starter and lightly sweetened with honey for a loaf that's sturdy enough for sandwiches but pillowy like classic sandwich loaves. With a simple overnight rise, this recipe fits easily into any schedule and is perfect for beginners and seasoned sourdough bakers alike.
New to sourdough? Check out our How to Make Sourdough Starter Guide!

Table of Contents
If you love sandwiches but are skeptical of the "sourdough" bread loaves from the store that contain 25 ingredients, including conventional yeast, this recipe is for you!
When I first got started with sourdough, I couldn't figure out how sourdough bread from the store could claim to be sourdough and list yeast in the ingredients. I was also really skeptical that the grocery store bakery was allowing bread to ferment overnight. It just didn't add up.
There's a chance that bakeries make a sourdough discard bread that uses yeast to rise (totally fine), but if you're looking for a true, long-fermented sourdough sandwich bread, you aren't going to find it at the grocery store.
You can find it right here, though!
Sourdough sandwich bread is a classic staple every home baker needs. It's simple, versatile, and can turn the entire day around. Have you ever noticed how Ma Ingalls was always pulling some kind of bread out of her oven? That's because she knew a thing or two about taking care of a family.
Bread. And a whole lot of love and hard work. But also, bread.
Here's to being like Ma Ingalls and making fresh bread for our families.
Why You'll Love This Sourdough Sandwich Bread
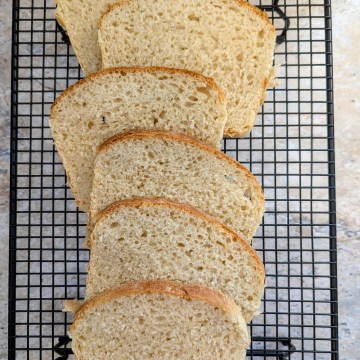
This sourdough sandwich bread is designed to give you everything you want in a soft, reliable loaf-perfect for sandwiches, toast, and everyday use. Unlike rustic artisan sourdough, this loaf bakes up tall, tender, and sliceable every time.
- Soft, fluffy interior with a light, even crumb that's perfect for sandwiches
- Beautifully tall loaf that holds its shape and slices cleanly
- Beginner-friendly method with simple steps and predictable results you can count on
- Naturally leavened using active sourdough starter for the best flavor and digestion
- Simple pantry ingredients you likely already have on hand
- Perfect for meal prep because it stays soft for days and freezes well
Why This Sandwich Bread Recipe Works
The truth is, I find sourdough sandwich bread a little finicky. It took me a while to get the hang of it and really get the texture close enough to traditional sandwich bread, so my husband didn't give me the "What the heck is this?" face.
It took quite a few tries, but here we are, and here's why it works...
This sourdough sandwich bread is carefully designed to give you a soft, reliable loaf that rises tall and slices beautifully every time (so long as you let it cool before cutting into it). Unlike rustic artisan sourdough, this recipe focuses on structure, softness, and consistency, which makes it perfect for everyday sandwiches and toast.
The dough is enriched with a small amount of fat, which helps create a softer crumb and keeps the bread tender for days. A carefully balanced hydration level ensures the dough is soft enough to stay light and airy, yet strong enough to hold its shape in a loaf pan and in a sandwich.
Using an active, bubbly sourdough starter provides natural leavening while maintaining a controlled rise, which is essential for achieving a tall, even sandwich loaf. Proper fermentation timing is key here. You want enough to build gas for lift, but not so long that the dough collapses.
Finally, shaping the dough with tension before placing it into the loaf pan helps it rise upward instead of spreading outward, giving you that classic bakery-style sandwich bread shape.
Ingredients You'll Need for Soft Sourdough Sandwich Bread
- Warm milk - Adds richness and softness to the crumb.
- Warm water - Lightens the dough and helps hydrate the flour without weighing it down.
- Active sourdough starter - Your natural leavening that gives rise, flavor, and structure.
- Softened butter - Creates a tender, sandwich-style texture.
- Flour (all-purpose or bread flour) - Forms the dough structure; bread flour gives a slightly chewier loaf.
- Salt - Enhances flavor and strengthens the gluten network.
- Honey - Adds moisture and a subtle sweetness to balance the sourdough tang.
Equipment You May Need
- Large mixing bowl
- Stand mixer with dough hook or clean work surface for hand kneading
- Two loaf pans (8.5x4.5 or 9x5)
- Parchment paper
- Kitchen scale (recommended)
- Clean kitchen towel or plastic wrap for covering the bowl
- Cooling rack
How to Make Sourdough Sandwich Bread (Step-By-Step Instructions)
Step 1: Mix the dough. In a large bowl, whisk together the warm milk, warm water, and sourdough starter until smooth.


Step 2: Add remaining ingredients. Stir in the softened butter, flour, salt, and honey until a shaggy dough forms.

3. Knead the dough:
If using a stand mixer: Knead with the dough hook on medium-low speed for 8-10 minutes until smooth and stretchy.
If kneading by hand: Turn the dough onto a lightly floured surface and knead for 10-12 minutes until soft and elastic.
Step 4: Bulk ferment (overnight rise). Transfer the dough to a greased bowl, cover, and ferment at room temperature for 10-12 hours or overnight.

Step 5: Shape the loaves. Gently punch down the risen dough and divide it into two equal pieces. Flatten each into a rectangle, then roll tightly into a loaf.

Step 6: Final rise. Place each loaf into a parchment-lined loaf pan. Cover and rise for 2-4 hours, or until puffy and near the top of the pan.
Step 7: Bake. Bake at 375°F for 45 minutes, or until the tops are golden and the loaves sound hollow when tapped.

Step 8: Cool. Transfer loaves to a cooling rack and let cool completely before slicing. This is the hardest part, but it's worth it!

Tips for Success
- For a softer crust, brush the freshly baked loaves with melted butter.
- Don't underkneed. You want the gluten to be fully developed for the best rise and softest crumb.
- Use a bubbly, active starter for the best rise and texture.
- If your kitchen is cold, place the covered dough inside the oven with just the light on, or on top of a heating pad set to low to help proofing.
- Don't rush the second rise! I find that waiting the full 4 hours gives it enough time to rise like classic sandwich bread.
- Fully cooled bread slices more cleanly, so avoid cutting too early (the hardest part)!
Sourdough Sandwich Bread Variations
- Honey Wheat Sandwich Bread: Replace 1 cup of flour with whole wheat flour.
- Seeded Loaf: Add sesame, poppy, or sunflower seeds to the dough or sprinkle on top.
- Milk & Honey Loaf: Add an extra tablespoon of honey for a sweeter family-friendly sandwich loaf.
Storage & Freezing
- Store at room temperature in a bread bag for 3-4 days.
- Freeze whole loaves or slices for up to 3 months.
- Thaw at room temperature or toast slices straight from the freezer.
How to Enjoy Sourdough Sandwich Bread
- Classic sandwiches like sourdough grilled cheese or clubs.
- With our chicken salad with Greek yogurt
- Toast it up and slather with butter and jam.
- Dip it in custard and fry it up for Sourdough French toast or sourdough French toast casserole.
- Cut it into cubes and dry it in the oven for sourdough bread crumbs.
- Cube it up for sourdough stuffing.
FAQs about Sourdough Sandwich Bread
Can I make this dairy-free?
Yes! Swap the milk for a plant milk and the butter for olive oil or vegan butter.
Why is my Sourdough Sandwich bread dense?
Usually due to under-kneading, an inactive starter, or under-proofing before baking. It's also important to remember that homemade sourdough sandwich bread doesn't have the same texture as conventional loaf bread that has been stripped of its nutrients and pumped with preservatives.
Can I bake this in one large loaf pan instead of two?
I don't recommend baking this in a single loaf pan because the dough is too large and may underbake in the center.

Sourdough Sandwich Bread
Ingredients
- 480 grams sourdough starter, active and bubbly (about 2 cups)
- 360 grams warm water (1 ½ cups)
- 110 grams warm milk (½ cup)
- 1,110 grams flour (all-purpose or bread flour, about 7 ½ cups)
- 8 tbs softened butter or coconut oil
- ¼ cup honey or sugar
- 1 tbs sea salt
Instructions
- Mix the Dough: In a large mixing bowl, whisk together the warm milk, warm water, and sourdough starter until smooth. Add the softened butter, flour, salt, and honey.
- Knead the Dough: If using a stand mixer: Knead on medium speed for 8-10 minutes, until the dough is smooth, elastic, and passes the window pane test.If kneading by hand: Turn the dough onto a lightly floured surface and knead for 10-12 minutes, until smooth, elastic, and passes the window pane test.
- First Rise (Bulk Ferment): Transfer the dough to a greased bowl, cover, and let it ferment in a warm place for 10-12 hours or overnight, until doubled and airy.
- Shape the Loaves: Gently punch down the dough and divide it into 2 equal pieces. Flatten each piece into a rectangle, then roll it up tightly into a loaf.
- Second Rise: Place each loaf into a parchment-lined loaf pan. Cover and let rise for 2-4 hours, or until puffy and slightly domed above the pan.
- Bake: Preheat the oven to 375°F. Bake the loaves for 45 minutes, or until golden brown on top.
- Cool completely: Remove from the pans and let the bread cool fully on a wire rack before slicing.
Sourdough Sandwich Bread Didn't turn out Quite Right? Check out:
- Why is My Sourdough Not Rising?
- Why is My Sourdough Bread Gummy? (And How to Fix it)
- Why is My Sourdough Starter Not Rising?
- Why is My Sourdough So Sticky? (And How to Fix it!)
You're Going to Love this Sourdough Sandwich Bread!
Once you get the hang of making your own sourdough sandwich bread, it will become one of your favorite weekly rhythms. Having a freshly baked loaf on hand will help you feel prepared for mealtimes, since you can always have buttered toast as a side or make everyone a nice sandwich! Don't forget to knead your dough until it passes the windowpane test, and don't rush that second rise. Your future self will thank you. Happy baking, friends!


